Advanced Map Editing In The EarthBound ROM
By HyperBound
Map editing is often the first step in hacking, and can trip up a lot of first time game developers. In this tutorial we'll be looking at map editing that goes a little bit beyond simple tile re-arrangement. More specifically, we'll be looking at how to re-arrange current elements and add new elements to the map tilesets. It's not as difficult as you think!
First off, I wanted to document exactly where all the map information is in the EB rom. This was a bit more challenging than I thought, since it required some hexadecimal math. Mr Tenda was kind enough to help me out, and I came up with the following info:
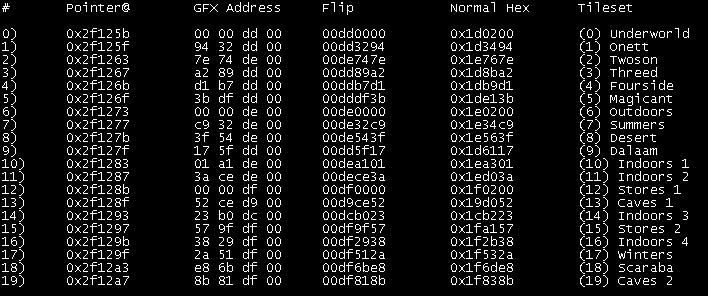
This table lists where the map pointers are, where the different map graphics are stored, and what tileset they are. It also helps sort out some of the math I had to do in order to get usable hex numbers. I have attached the file to this tutorial.
Now that I had all the files located, I just needed to decompress them using the PK Hack reset button. To save all you people some time, I have made a zip file containing all the decompressed map graphics. These files can be opened up in Tile Layer Pro/Tile Molester to be edited. I labeled all the tilesets to make things a little easier.
When I first started editing things in TLP, I was very annoyed that it seemed to screw up the colours of whatever bitmap I tried to import. On the suggestion of Jeffman, I decided to try out Tile Molester. Although this program sounds incredibly dirty, it worked out fantastically well. With some screwing around I figured a relatively easy way to add new graphics to maps. I took some screenshots, so I'll walk you through the process step by step.
You will need a few things:
1) Some version of Photoshop
2) Tile Molester (available at Zophar's Domain)
3) Jhack
4) Java runtime environment
5) Basic knowledge of JHack (tile editor, map editor, reset button, simple hex editing)
First of the bat, pick a sprite you want to put into the game. This can be any sprite with 16 colours or less, and isn't ridiculously huge. For now, don't worry about colours. For simplicity, I took a Tomato from the Magicant palette.

For the sake of the tutorial, I'll say we want to put this Tomato in Onett somewhere. This means I will have to add it to the Onett tileset (included in that zip file I made). However, the colours on this Tomato are all wrong! If I want to put this Tomato in Onett, I'll need to change it's colours to those of the Onett daytime tileset. Photoshop will allow me to skip some grief by using Indexed Colour settings.
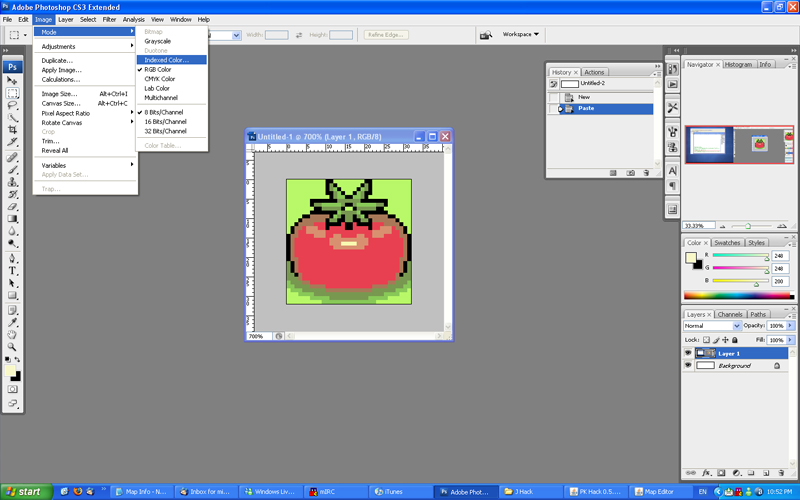
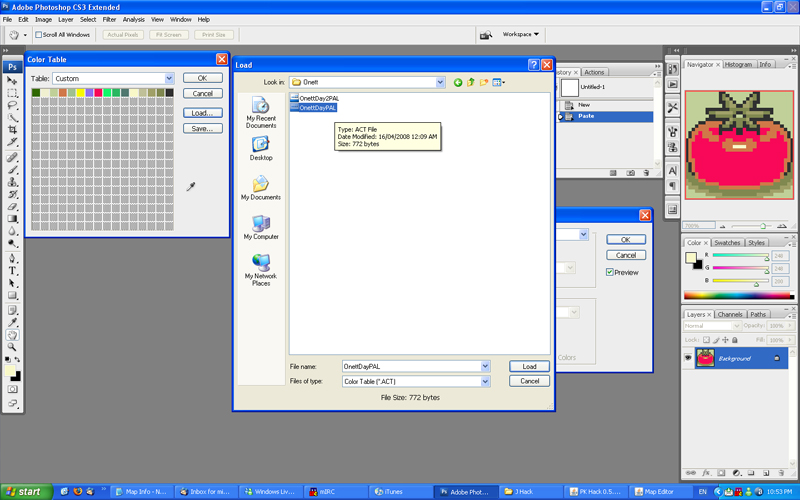
In the Indexed Colour settings, I'll select the "Custom..." option. This allows me to open .act palettes, which are palettes that have been saved previously.
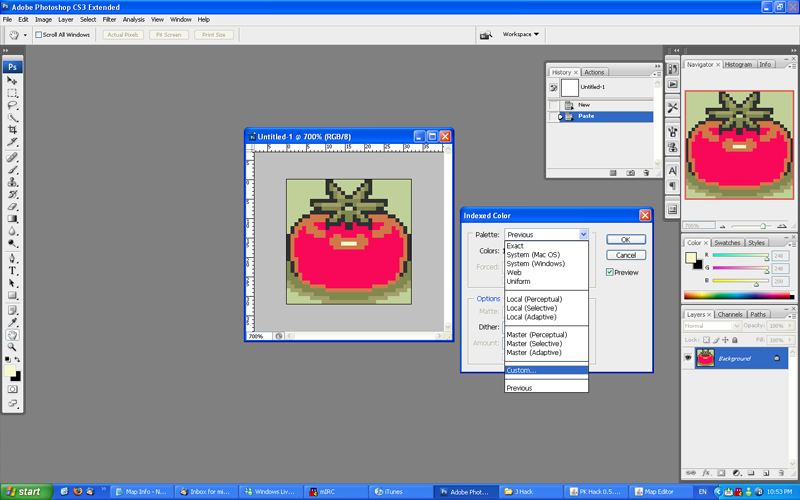
In this case, you'll see I've premade an Onett Daytime Palette (I've attached it along with this tutorial, if you'd like to try it). The palette contains the sixteen colours used in Onett. Use the "Load..." button to open it up, and you'll see what I mean.
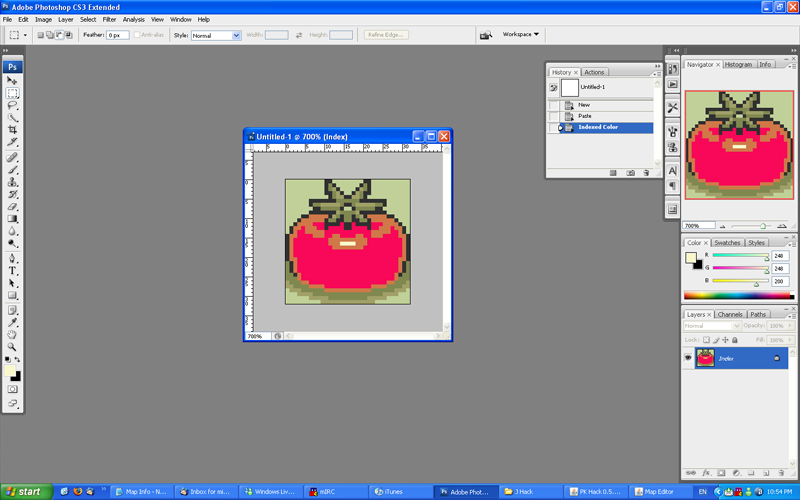
Confirm everything, and return back to a normal Photoshop view. You can see that the Tomato's colours have changed! This Tomato is now compatible with Onett's palette!
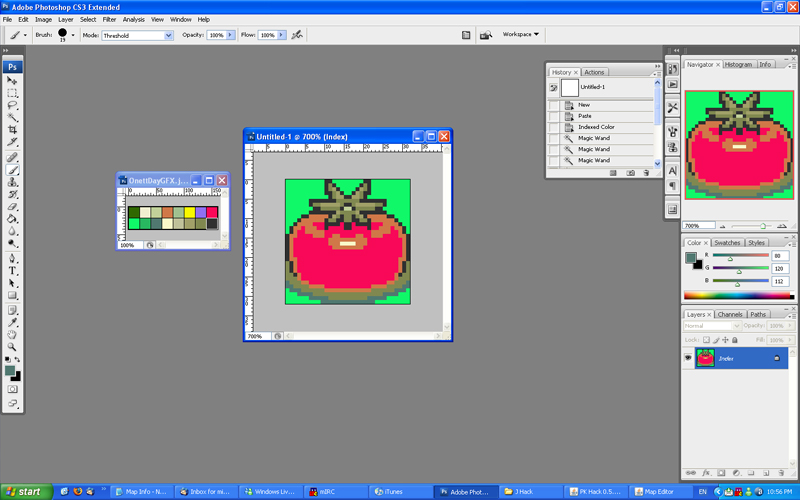
Photoshop does a pretty good job of matching colours, but is not perfect by any stretch of the imagination. I suggest cleaning up the image with a brush tool, and changing the colours to your taste. Also, change the background colour to whatever background you want to put the Tomato on. In this case, I want the Tomato in the grass, so I made the background grass green. I have attached a jpg file of the Onett palette, to make editing the colours a little easier.
Once you are happy with how the image looks, go to "save as..." in Photoshop and make a bitmap copy of it. The BMP should be Windows 8-bit format, for easy transfer to the Tile Molester. That's it for Photoshop, close up and save whatever files you want to keep.
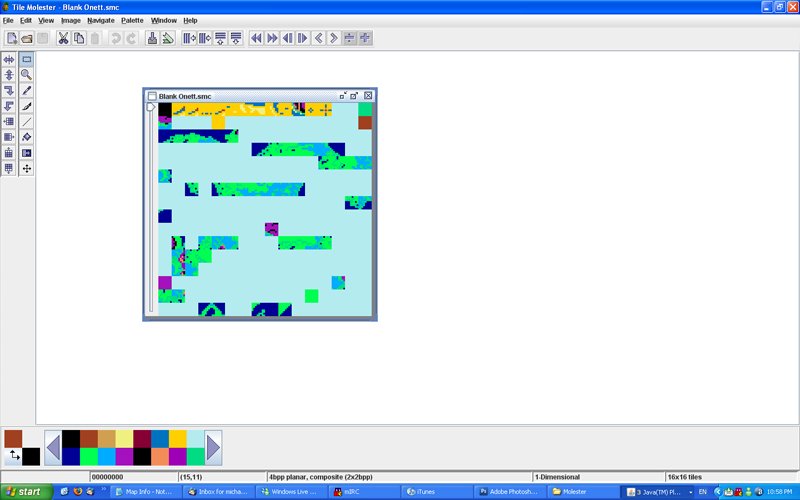
Next, open up Tile Molester and load up the Onett SMC file (included in the zip file). This file contains the Onett tileset, and when you open it you'll see all the minitiles spread out in a seemingly random order. The screenshot below may look a little weird, since I stripped out a lot of Onett's graphics beforehand.
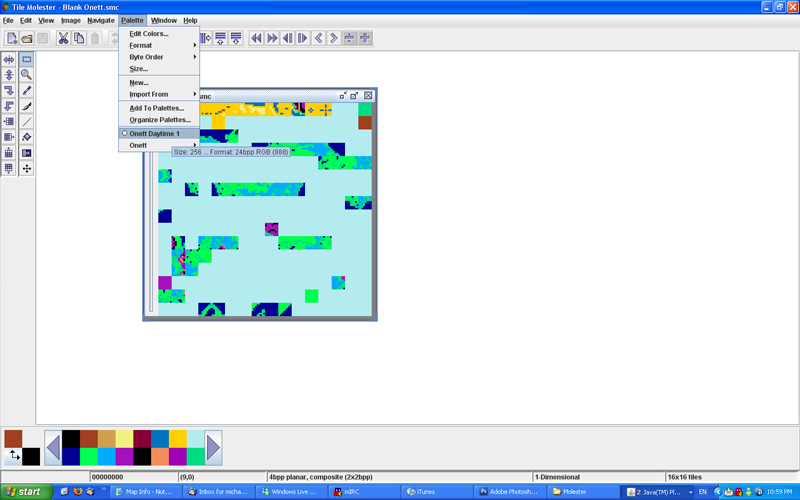
Unfortunately, the colours are all off when you open up the minitiles. The easiest way to fix this is to create a new palette by manually adjusting the colours at the bottom left of the screen. You'll need to change the 16 colours already there to the 16 in the Onett palette (in the same order). Refer to the OnettDayGFX.jpg for exact colours.
This is a pain, but you only have to do it once, as you can save the palette in Tile Molester for future use. Then you can load it up with the click of a button.
I may try and figure out a way to save palettes and share them between users, to save you guys some trouble. This would speed this step up quite a bit. All the info regarding palettes is saved in an XML file in the Tile Molester resources directory, so it shouldn't be too hard to figure out.
Once you load up the palette, you'll notice that all the colours look correct. This makes editing a lot easier to do. You can see I also added grid lines and increased the canvas size to make editing a little easier.

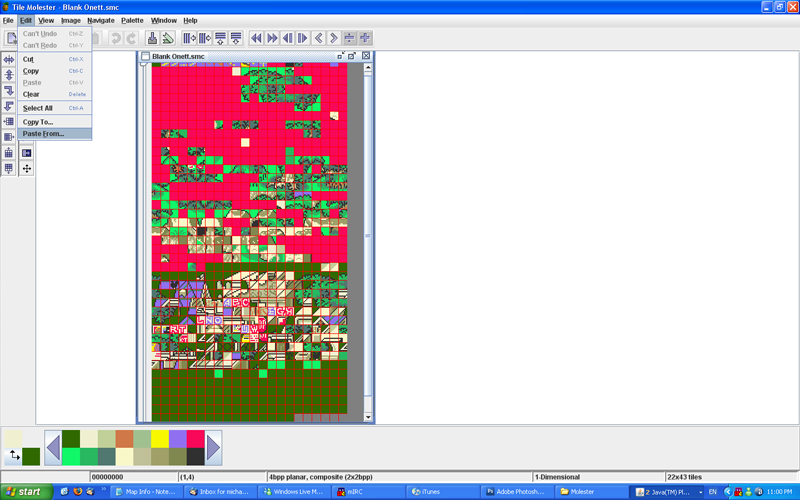
Now that we have all that sorted out, it's time to import the bitmap we made. Go to "Edit" and select "Paste from...". Select the bitmap we saved earlier and hit okay.
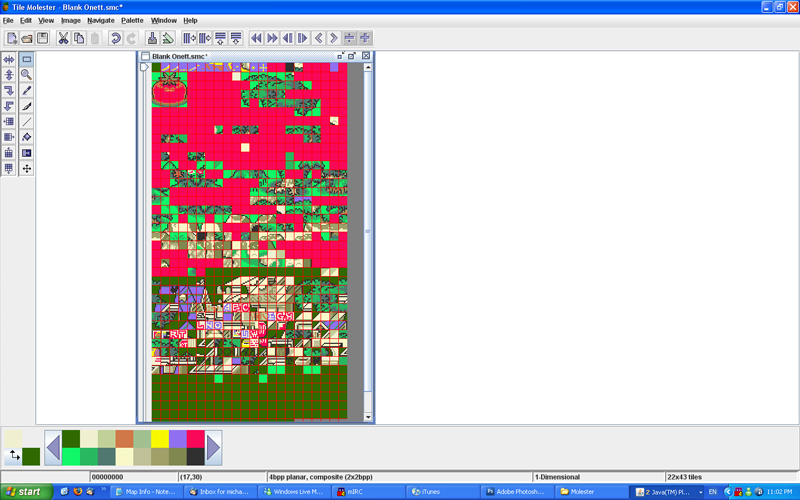
Our Tomato has arrived! Drag it on top of some minitiles you don't mind overwriting. In my file, I stripped out all minitiles but those vital for the area (zone walls, block colours, trees, etc.). Once you are happy with where it is, click somewhere away from the Tomato. The Tomato should now be converted to minitiles.
Save the file and close Tile Molester for now.
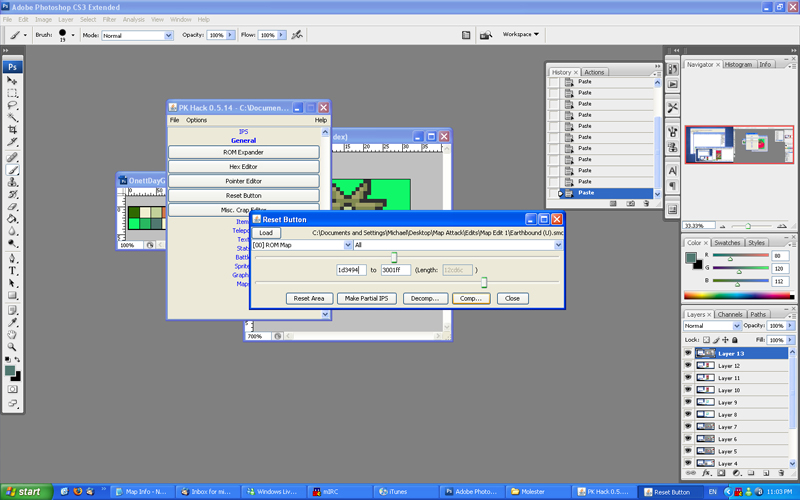
Next we have to open up Jhack and turn our Tomato minitiles into a map tile. In order to do that, we need to compress the map graphics back into the Earthbound rom using the Reset button. Normally you want to compress the graphics into a section of the expanded EB Rom, and change the Hex pointer to point to the new location. However, since this is my test rom and I don't care if stuff gets broken, I will simply put it back where it came from. Select the proper address, hit compress, select the edited Onett map file and confirm
Close the Reset button, and enter Jhack's Tile Editor. You'll see that our Tomato is mixed about with the minitiles. Pieces that were side by side horizontally will be together - keep this in mind the next time you import a bitmap, it makes this phase easier.
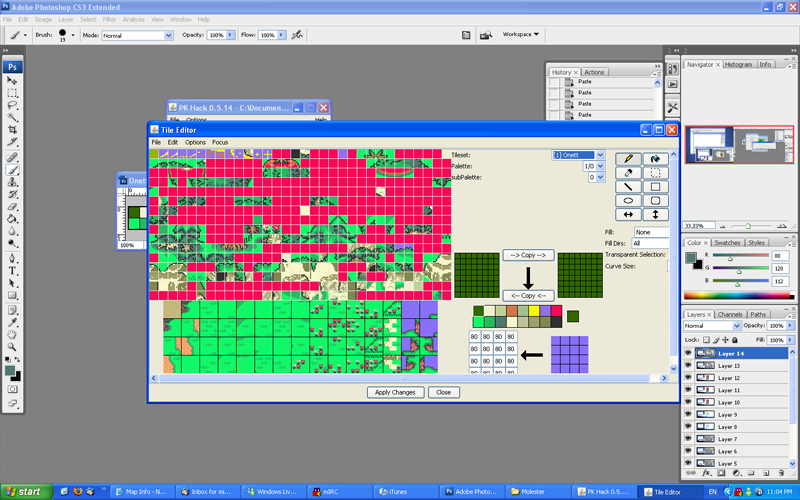
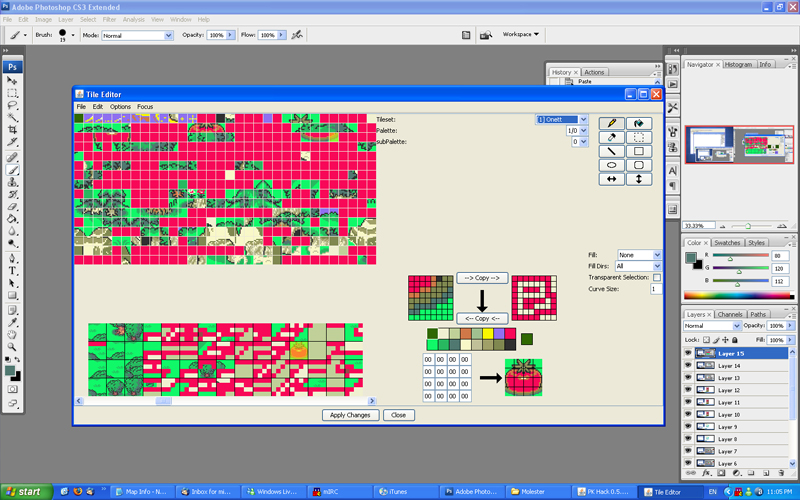
Using the tile editor, pick a map tile you aren't going to need anymore and assemble the Tomato. The minitiles fit together like a little puzzle. Once you have put the Tomato together, apply changes.
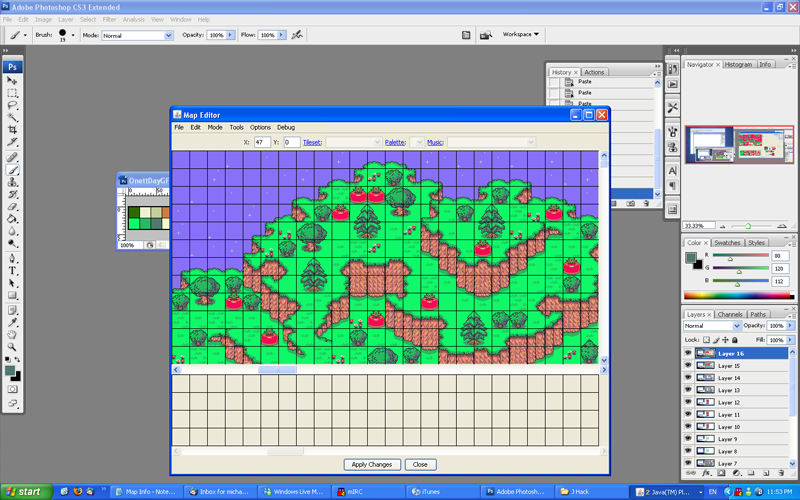
Close the tile editor, and enter the map editor. You should see the Tomato in the map tiles under Onett's tileset. Success! Plant that Tomato wherever you see fit. You can see I have done some other editing as well - the large evergreen trees are from the Winter's tileset.
One thing I forgot to mention. You'll need to go into JHack's Tile Editor and change the map tile's properties (number grid). These numbers determine whether or not you can walk over something, if it's a door, if it'll give you sunstroke, etc... This is tedious, but not very hard - use other map tiles to guide you.
Anyways, I hope that this tutorial was useful for everyone out there. Map editing can be tricky, but is ultimately one of the most rewarding parts of PK Hacking.
Tutorial by HyperBound
By HyperBound
Map editing is often the first step in hacking, and can trip up a lot of first time game developers. In this tutorial we'll be looking at map editing that goes a little bit beyond simple tile re-arrangement. More specifically, we'll be looking at how to re-arrange current elements and add new elements to the map tilesets. It's not as difficult as you think!
First off, I wanted to document exactly where all the map information is in the EB rom. This was a bit more challenging than I thought, since it required some hexadecimal math. Mr Tenda was kind enough to help me out, and I came up with the following info:
This table lists where the map pointers are, where the different map graphics are stored, and what tileset they are. It also helps sort out some of the math I had to do in order to get usable hex numbers. I have attached the file to this tutorial.
Now that I had all the files located, I just needed to decompress them using the PK Hack reset button. To save all you people some time, I have made a zip file containing all the decompressed map graphics. These files can be opened up in Tile Layer Pro/Tile Molester to be edited. I labeled all the tilesets to make things a little easier.
When I first started editing things in TLP, I was very annoyed that it seemed to screw up the colours of whatever bitmap I tried to import. On the suggestion of Jeffman, I decided to try out Tile Molester. Although this program sounds incredibly dirty, it worked out fantastically well. With some screwing around I figured a relatively easy way to add new graphics to maps. I took some screenshots, so I'll walk you through the process step by step.
You will need a few things:
1) Some version of Photoshop
2) Tile Molester (available at Zophar's Domain)
3) Jhack
4) Java runtime environment
5) Basic knowledge of JHack (tile editor, map editor, reset button, simple hex editing)
First of the bat, pick a sprite you want to put into the game. This can be any sprite with 16 colours or less, and isn't ridiculously huge. For now, don't worry about colours. For simplicity, I took a Tomato from the Magicant palette.
For the sake of the tutorial, I'll say we want to put this Tomato in Onett somewhere. This means I will have to add it to the Onett tileset (included in that zip file I made). However, the colours on this Tomato are all wrong! If I want to put this Tomato in Onett, I'll need to change it's colours to those of the Onett daytime tileset. Photoshop will allow me to skip some grief by using Indexed Colour settings.
In the Indexed Colour settings, I'll select the "Custom..." option. This allows me to open .act palettes, which are palettes that have been saved previously.
In this case, you'll see I've premade an Onett Daytime Palette (I've attached it along with this tutorial, if you'd like to try it). The palette contains the sixteen colours used in Onett. Use the "Load..." button to open it up, and you'll see what I mean.
Confirm everything, and return back to a normal Photoshop view. You can see that the Tomato's colours have changed! This Tomato is now compatible with Onett's palette!
Photoshop does a pretty good job of matching colours, but is not perfect by any stretch of the imagination. I suggest cleaning up the image with a brush tool, and changing the colours to your taste. Also, change the background colour to whatever background you want to put the Tomato on. In this case, I want the Tomato in the grass, so I made the background grass green. I have attached a jpg file of the Onett palette, to make editing the colours a little easier.
Once you are happy with how the image looks, go to "save as..." in Photoshop and make a bitmap copy of it. The BMP should be Windows 8-bit format, for easy transfer to the Tile Molester. That's it for Photoshop, close up and save whatever files you want to keep.
Next, open up Tile Molester and load up the Onett SMC file (included in the zip file). This file contains the Onett tileset, and when you open it you'll see all the minitiles spread out in a seemingly random order. The screenshot below may look a little weird, since I stripped out a lot of Onett's graphics beforehand.
Unfortunately, the colours are all off when you open up the minitiles. The easiest way to fix this is to create a new palette by manually adjusting the colours at the bottom left of the screen. You'll need to change the 16 colours already there to the 16 in the Onett palette (in the same order). Refer to the OnettDayGFX.jpg for exact colours.
This is a pain, but you only have to do it once, as you can save the palette in Tile Molester for future use. Then you can load it up with the click of a button.
I may try and figure out a way to save palettes and share them between users, to save you guys some trouble. This would speed this step up quite a bit. All the info regarding palettes is saved in an XML file in the Tile Molester resources directory, so it shouldn't be too hard to figure out.
Once you load up the palette, you'll notice that all the colours look correct. This makes editing a lot easier to do. You can see I also added grid lines and increased the canvas size to make editing a little easier.
Now that we have all that sorted out, it's time to import the bitmap we made. Go to "Edit" and select "Paste from...". Select the bitmap we saved earlier and hit okay.
Our Tomato has arrived! Drag it on top of some minitiles you don't mind overwriting. In my file, I stripped out all minitiles but those vital for the area (zone walls, block colours, trees, etc.). Once you are happy with where it is, click somewhere away from the Tomato. The Tomato should now be converted to minitiles.
Save the file and close Tile Molester for now.
Next we have to open up Jhack and turn our Tomato minitiles into a map tile. In order to do that, we need to compress the map graphics back into the Earthbound rom using the Reset button. Normally you want to compress the graphics into a section of the expanded EB Rom, and change the Hex pointer to point to the new location. However, since this is my test rom and I don't care if stuff gets broken, I will simply put it back where it came from. Select the proper address, hit compress, select the edited Onett map file and confirm
Close the Reset button, and enter Jhack's Tile Editor. You'll see that our Tomato is mixed about with the minitiles. Pieces that were side by side horizontally will be together - keep this in mind the next time you import a bitmap, it makes this phase easier.
Using the tile editor, pick a map tile you aren't going to need anymore and assemble the Tomato. The minitiles fit together like a little puzzle. Once you have put the Tomato together, apply changes.
Close the tile editor, and enter the map editor. You should see the Tomato in the map tiles under Onett's tileset. Success! Plant that Tomato wherever you see fit. You can see I have done some other editing as well - the large evergreen trees are from the Winter's tileset.
One thing I forgot to mention. You'll need to go into JHack's Tile Editor and change the map tile's properties (number grid). These numbers determine whether or not you can walk over something, if it's a door, if it'll give you sunstroke, etc... This is tedious, but not very hard - use other map tiles to guide you.
Anyways, I hope that this tutorial was useful for everyone out there. Map editing can be tricky, but is ultimately one of the most rewarding parts of PK Hacking.
Tutorial by HyperBound