Welcome welcome, this is a quick ’n dirty tutorial for how to clean your scanned pencil/pen art in Photoshop to make it crisper and/or to prepare it for digital coloring. Nevermore shall you rely on the magic wand tool or manually erase white portions! I am using Photoshop CS3, but older and newer versions should have the same basic processes. There are many ways of cleaning scanned art, but here are four of my favorites.
1) USING BRIGHTNESS/CONTRAST ADJUSTMENT
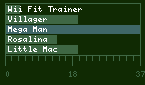
By using this, you can make white parts whiter and dark parts darker. Go to Image> Adjustments> Brightness/Contrast. Play around with that until you like what you see.
You can go from this, to this.
2) USING BURN AND DODGE TOOL
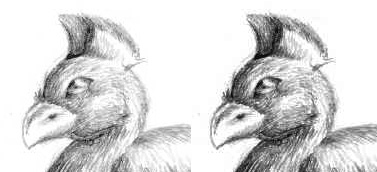
This tool is below the smudge/sharpen/blur tool and looks like a lollipop(dodge), pinching hand(burn), or cake patty(sponge). Click and hold the tool’s icon for a moment to switch between the 3 tools. I’m not sure what sponge does, so dodge and burn are what we’ll focus on. These two tools have their roots in traditional photography where, during development of photo paper, parts of the paper would be preferentially blocked or over-exposed to turn the part lighter or darker.
In Photoshop, these tools work well when you’ve got specific sections that you want to make lighter or darker without altering the entire picture using brightness/contrast adjustment. So go ahead and use the dodge tool to lighten up things and burn tool to make things darker. Play around with exposure and brush sizes if you like. The effect is subtle, yet effective.
You can turn this, into this.
3) USING MULTIPLY
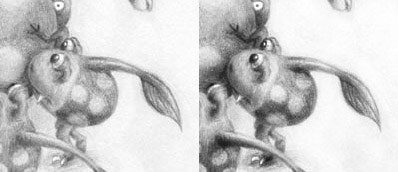
The first two techniques are fine and dandy if you scanned a b/w picture and you want to keep it that way, but how about coloring? Assuming you want to color inside the black lines of your picture, then this is one of the cheapest ways to do it. To use multiply, your working layer has to be something other than Background. If Background is your only layer, then right-click the layer and duplicate it. Then you can delete the original Background or do whatever to it. Making sure you are on the working layer, click this drop-down menu and change it from Normal to Multiply.
What multiply does is it turns white parts transparent and black parts solid, while everything in between is a flavor of translucent depending on how much of its value is white. That is, the whiter a grey is, the more transparent it is. Now try coloring on a layer underneath your working layer. You’ll find that it will show up clearly where there are white parts above it and the black parts will remain intact.
Before, After.
4) LOAD CHANNEL AS SELECTION
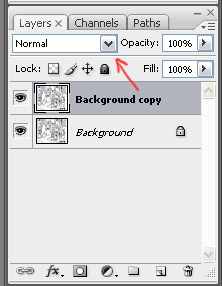
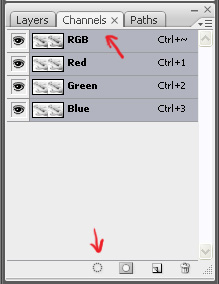
I call the Multiply technique cheap because although the white parts are invisible, they’re still there. First, clean up your image the best you can using the first and second techniques in this tutorial. (This technique doesn’t work very well for images that have too much smudgy grey around the edges.) Now make sure your working layer is not the Background by duplicating it if necessary. Make a new layer under your working layer and fill it with white. Now make sure you have the working layer selected again. Go to the channel window by clicking the folder next to the Layers folder or Windows> Channels. Click on the far left icon on the bottom of the window, which is called Load Channel as Selection.
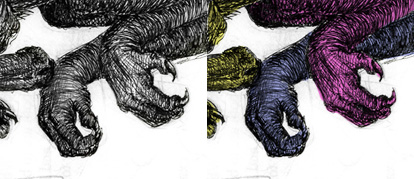
What this does is select all the white portions of the image, as well as the white within all the grey and colored sections. Go to Edit> clear and it shall delete all these white portions, making the greys and colors translucent. The image will probably seem too light. What you should do is go back to the layer window and lock your working layer. The Lock function is right above the layers. Click the checker-patterned icon. What this does is prevent you from touching any space that has not already drawn on. Anyways, select a large black brush and color directly onto the locked working layer and it should fill in all the occupied portions of the image with black. Or if you want, choose some other color and turn all formerly grey/black/colored portions into the color of your choice, as seen in sample 3 below. Sample 2 is when the image is filled with black and color is added to one of the layers underneath.
Original, sample 2 and sample 3.

And that’s all I have to share. Have fun and go experiment!
1) USING BRIGHTNESS/CONTRAST ADJUSTMENT
By using this, you can make white parts whiter and dark parts darker. Go to Image> Adjustments> Brightness/Contrast. Play around with that until you like what you see.
You can go from this, to this.
2) USING BURN AND DODGE TOOL
This tool is below the smudge/sharpen/blur tool and looks like a lollipop(dodge), pinching hand(burn), or cake patty(sponge). Click and hold the tool’s icon for a moment to switch between the 3 tools. I’m not sure what sponge does, so dodge and burn are what we’ll focus on. These two tools have their roots in traditional photography where, during development of photo paper, parts of the paper would be preferentially blocked or over-exposed to turn the part lighter or darker.
In Photoshop, these tools work well when you’ve got specific sections that you want to make lighter or darker without altering the entire picture using brightness/contrast adjustment. So go ahead and use the dodge tool to lighten up things and burn tool to make things darker. Play around with exposure and brush sizes if you like. The effect is subtle, yet effective.
You can turn this, into this.
3) USING MULTIPLY
The first two techniques are fine and dandy if you scanned a b/w picture and you want to keep it that way, but how about coloring? Assuming you want to color inside the black lines of your picture, then this is one of the cheapest ways to do it. To use multiply, your working layer has to be something other than Background. If Background is your only layer, then right-click the layer and duplicate it. Then you can delete the original Background or do whatever to it. Making sure you are on the working layer, click this drop-down menu and change it from Normal to Multiply.
What multiply does is it turns white parts transparent and black parts solid, while everything in between is a flavor of translucent depending on how much of its value is white. That is, the whiter a grey is, the more transparent it is. Now try coloring on a layer underneath your working layer. You’ll find that it will show up clearly where there are white parts above it and the black parts will remain intact.
Before, After.
4) LOAD CHANNEL AS SELECTION
I call the Multiply technique cheap because although the white parts are invisible, they’re still there. First, clean up your image the best you can using the first and second techniques in this tutorial. (This technique doesn’t work very well for images that have too much smudgy grey around the edges.) Now make sure your working layer is not the Background by duplicating it if necessary. Make a new layer under your working layer and fill it with white. Now make sure you have the working layer selected again. Go to the channel window by clicking the folder next to the Layers folder or Windows> Channels. Click on the far left icon on the bottom of the window, which is called Load Channel as Selection.
What this does is select all the white portions of the image, as well as the white within all the grey and colored sections. Go to Edit> clear and it shall delete all these white portions, making the greys and colors translucent. The image will probably seem too light. What you should do is go back to the layer window and lock your working layer. The Lock function is right above the layers. Click the checker-patterned icon. What this does is prevent you from touching any space that has not already drawn on. Anyways, select a large black brush and color directly onto the locked working layer and it should fill in all the occupied portions of the image with black. Or if you want, choose some other color and turn all formerly grey/black/colored portions into the color of your choice, as seen in sample 3 below. Sample 2 is when the image is filled with black and color is added to one of the layers underneath.
Original, sample 2 and sample 3.
And that’s all I have to share. Have fun and go experiment!