News:

2.1 Tilesets

1. General Information:


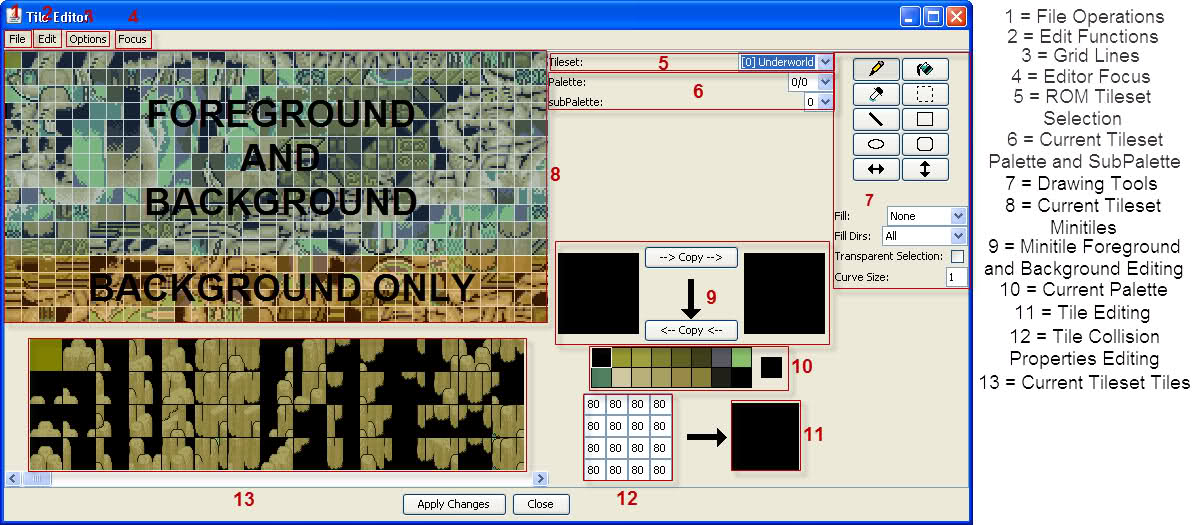
There are 20 tilesets you can use(#5), each containing 511 minitiles(#8) you can edit(with one tile reserved by the game), and over 1,000 tiles(#13) made up of 16 minitiles in a 4×4 grid. Each tile has it’s own collision properties(#12), controlling if the player can move onto that tile, or if the player should be represented as being underwater or whatever. Any part of the map you will be making needs to be made of tiles already made in the tileset. The first 384 minitiles have a foreground and a background layer, the last 128 only have the background layer. Thus any trees or buildings the player can walk behind NEED to be made using the first 384 minitiles to provide that transparency effect.

Remember to Apply your changes, and save your ROM after editing, and as I’ve said before, make backups! Tileset and Map editing are the two things most likely to destroy your ROM, so make backups. Sometimes JHack will glitch out when editing tilesets, and crash when trying to open a tileset. That ROM is usually dead, so make BACKUPS!


2. Palettes, Subpalettes, and Color Editing:


Each Tileset has a different number of Palettes and Subpalettes(#6) that can be used for the tileset. Each palette for a tileset is 16 colors, but the first color is always transparent. You can not add palettes, so you need to make use of the palettes you have for tilesets. If you plan on having tilesets that use multible palettes(for a day and night appearance or whatever), make sure you pick a tileset with enough palettes to accomplish the effect you want. This is why it’s important to plan out your hack ahead of time, so you know which tilesets you are re-using, which you will be editing, and what you can do with the ones you are editing. With only 15 colors per palette, you need to be very creative in how you make locations.

You are probably asking what the difference is between a Palette and a Subpalette. Palettes are how the game defines boundaries between areas, making those of a different palette not visible while in another palette. You can use multiple Subpalettes in the same Palette area though, which is how you can have different colored buildings on the same area of the map while using the same minitiles, like with Onett. Each tile gets assigned it’s own subpalette from the subpalettes available. All blocks of tiles on the map will use the same palette, but they can have different subpalettes for every tile in them. Thus the tilesets with many subpalettes offer the most options for different colors on the same area of the map. Just select your subpalette before you place the minitile on a tile.

Color editing is a snap. Just right click the color you want to change on the palette you want to edit(#10), then click on the RGB tab. There are three values for each color, ranging from 0 to 255. Just pick the color you want, then hit OK. It’s just that easy. Keep in mind that first color in the palette is ALWAYS transparent. You can change the color it uses, but in-game it will always be black/transparent. Consider the first color to be color 0, and the rest are your real colors, refering to them as 1-15 makes it easier to keep track of the colors you can use.


3. Editing Mini-Tiles:

A mini-tile is a square 8 pixels by 8 pixels. Each pixel can be any of the colors of the current Palette/SubPalette. Just pick a color(#10) and a tool(#7), and then pick a minitile to edit(#8). There are two panes shown for minitiles(#9). The one on the left is the background, the one on the right if the minitile has it is the foreground. When walking on a minitile with both a foreground and background, whatever is shown on the foreground will be in front of the character, and the background will be behind the character. This is how trees and buildings have that 3Dish effect. The transparent color is important for making foregrounds, without it you wouldn’t be able to see a character standing on a minitile with a foreground. You will get the most out of minitiles if you are creative in re-using them in tiles.

Keep in mind that in order to see your minitiles in-game, you need to create tiles using them. A minitile is only 1/16th of a tile, so if you wanted what you are drawing to be a full tile in-game, you need to make your image cut up into 16 8×8 pixel sections. The game stores the minitiles in the most unorganized fashion, you don’t have to do things the way the programmers did. Feel free to make your minitiles in any order you want. I prefer having similar minitiles next to each other, so I can see what it looks like before I put it in the tile.

Pick your Tileset, Palette, SubPalette, then whatever drawing tool you wish, then select the mini-tile you want to edit. This will bring it up in the foreground and background editor panes. Pick your color from the palette, and draw. First thing to draw is the left pane, which is the background layer. If your minitile will be something the player should pass behind, then draw that part on the right pane, which is the foreground layer. Check out minitiles already in the game to get an idea of how the game pulled off the multiple layer effect if you are having problems understanding it.

Look at the minitiles in-game already, and how they relate to the tiles. Check out buildings and trees, pathways and walls. Unless you are planning on a graphical overhaul, it helps to get familiar with the “EarthBound look”. The SNES is capable of much more detail(FF6, Chrono Trigger), and you can do much more with the graphics than the EarthBound programmers did, but unless all graphics are updated to reflect the new look, your work will look out of place in-game.

Thanks to Mr. Accident for this info: The extra data for palette event flags (and other stuff like an alternate address to read from depending on the palette flag, palette animation style, and sprite palette) are all stored in the “transparent” color entries of each map palette. That’s why so many palettes have weird colors in their first entries.


4. Editing Tiles and Collision Properties:

Now it’s time to create the building blocks you will be making the map out of. Just pick a tile(#13) in the tileset, and it will appear in the editing pane for it(#11), right next to the grid of numbers(#12). Then select a minitile, and put it in the tile editing pane. Once you have finished creating your new tile, you need to edit the collision properties for each minitile inside that tile. This is because the collision data isn’t tied to the minitiles, but the tiles they are made out of. This means you can use the same minitile with different collision properties in the same tile, as well as across the tileset.

This is a list of values seen and mostly understood for collision properties. Messianic did most of the legwork on figuring out what these are.

00 = walkable space.
01 = a tile in which the object featured will appear on top of you. (Such as walking behind a building with only your head poking out, tree top covering your lower body, etc.)
03 = not entirely sure, but probably almost the same as 01.
04 = desert. (Makes you sweat and has the chance to cause Sunstroke)
08 = waist-high water. (Makes sprites in it sink to their waist, as in Fourside Sewers, and shallow Deep Darkness water.)
09 = same function as 01, only in the waist-high water context.
0b = same function as 03, only in the waist-high water context.
0c = deep water. (Submerges your whole body and makes you take damage.)
0d = same function as 01, only in the deep water context.
0f = same as 03, only in the Deep Water context.
10 = ladder/stairs/rope. (Same deal as 90 I think when it comes to this.)
80 = non-walkable tile. (Usually walls and structures)
82 = non-walkable tile. Likely that it is used to indicate a mini-tile as solid as 80, yet interacting with it allows you to talk to a sprite on the other end of it, such as desks and whatnot.
90 = a door/text event. (I think without this number being there, making a door in the map editor even with a valid destination won’t even trigger because the door is not on a valid “door” 90 mini-tile. I think it won’t make text appear unless the “door” is on this mini-tile.)

Keep in mind the variable tends to work like setting a bit, with two bits. Blue Antoid lays it out like this:

80 – Solid
40 – Not used?
20 – Not used?
10 – Map object compatibility (Door/Ladder/Stairs)
08 – Water effect
04 – Damage effects (sunstroke, combines with water for drowning)
02 – Misc effects (Talk across solid space, transparency)
01 – Layer 2 transparency


You can set the left and right bits of the hex byte to whatever you need for that minitile, mix and match style.

Look at the tiles already in the tilesets. Notice the different sizes of things, like how doors are generally 3/4ths of a tile. Unless you plan on completely remaking the graphics for the maps and sprites, it’s a good idea to get familiar with how large things should be. If you have a single story building that’s taller than a two story building, it’s going to look bad. For example, most of the single story homes in Onett and Twoson are two tiles large, with one for the face of the building, and one for the roof. There are variations on this, but most conform to that. Two story buildings tend to be three or four tiles tall, and three story buildings tend to be five.

Roads differ if they are paved or dirt, and if they are using the usual perspective or Fourside’s. The dirt roads in-game are only one tile wide, but they are usually made out of two tiles, to add a border to the road that blends in with the local area. Paved roads have one tile of road, and a tile on either side for the sidewalk and border. The roads in Fourside are either two or three tiles wide, depending on if the road is going side to side or at the 45 degree angle. Side to side, the road is two tiles, all road if there is no sidewalk, or a thinner road with sidewalks. At a 45 degree angle, the road is three tiles wide, and has one tile of just road going down the center, with tiles for the rest of the road and sidewalks surrounding that line.

Trees can be small one tile shrubs, two tiles, four tiles, or the six tiles large Palm trees. Benches are usually half a tile. Ropes look like 1/4th of a tile, but they really are 1/2th of a tile, though you could make them 1/4th if you wanted to. Stop signs are about 1/2th of a tile, small signs are usually 1/4th-1/2th of a tile, billboards are four tiles or less. Ladders are 1/2th of a tile. If you aren’t certain what size something should be, look around the Map, and find something that should be around the right size.

Remember, most towns face South-West, unless you are using Fourside’s perspective. Buildings, vertical roads, objects, everything should be facing South-West. In Fourside, everything faces South instead. Most outdoor areas that are not towns uses the Fourside perspective, except Summers, and Winters and Scaraba use both. It’s not too important which one you use, just don’t use both on the same area of the map. You can use both in a single map, but if both are visible to the player at the same time, it won’t look right, since the perspective will be broken.

← 2.0 Tileset and Map Editing | 2.1 Tilesets | 2.2 Map Editing →

Junk:

Activities:

EarthBound Fanfest 2010
MOTHER 2 Novel Translation Project!
EarthBound Central -- Good News for the Modern Fan
Fangamer Banner
MOTHER 3 Fan Translation
Starmen.Net EarthBound Walkthrough
Starmen.Net Mother 3 Walkthrough
Donate to Starmen.Net!

Site Info:

Wanna know more about the staffers? The Site History? The Forum Badge Guide? All the info is here!

Polls:

How do you use Starmen.net?
Last Week's Poll
Which of the Super Smash Bros. Newcomers is your favourite?
Image of Last Week's Poll

Radio PSI:

Bringing the EarthBound community together through the magic of music.
Privacy Policy