News:

2.2 Map Editing


Map editing is where most hacks stop, or get horribly broken beyond any hope of repair. Save after making small changes, and keep a history of backups. This is one of the hardest things to do right in hacking the EarthBound ROM, and the most likely to destroy your ROM. Rule #1 is backups for this very reason, since it is the most important rule. Don’t come crying to me when you’ve done three hours of map making, only to find your Door data or something got turned into gibberish, making the ROM unusable.


1. General Information:

There are two programs for editing the maps, and while both have a similar interface, there are things each does better than the other. Even worse, there are some minor incompatiblity problems with the two editors. For starters, Mr. Accident’s Map Editor 4.x uses the small free space towards the end of the ROM known as the PK Hack System Area of Doom. Thus, any sort of hack that puts data there is incompatible with Mr. A’s editor, like EB++ 0.2+. Mr. A’s editor can’t open a 6MB ROM either. But JHack’s editor can’t edit doors properly. Editing the ROM with both editors at the same time will most likely break your ROM, and switching between the editors while you edit can ruin Door data, SPT/TPT entries, hotspots, and anything else on the Map. Messianic has had much experience with both editors, and has created the following edit order list.

DO NOT USE JHACK TO EXPAND YOUR ROM, USE MAP EDIT. IT WILL EXPAND IT ONLY A LITTLE, KEEP IT THAT WAY OR YOU WON’T BE ABLE TO SAVE ANYMORE.

You must use JHack and Mr. A’s Map Editor.

USE JHACK FOR:

- Enemy Editor: All enemy stats and whatnot. - Text Editing: All text related goodness. - SPT editing: Nuff said - Enemy Placement Groups Editor: DO NOT use Map Edit for this or you will not erase all flags relating to enemies like when they run from you when you beat a Sanctuary boss.

USE MAP EDITOR FOR:

- Adding new areas to the game ESPECIALLY ADDING NEW DOORS AND NEW DESTINATIONS. (Only map editor let’s you make new destinations for your doors) - Background Editing of all sorts.

USE BOTH TOGETHER FOR:

- TPT editing, as ME let’s you actually see the picture of the sprite.

THINGS YOU MUST DO:

Have a calculator expanded to switch between hex and dec so you can read between the two. JHACK uses hex and ME uses dec.

The map is made up of tile blocks, which are 4 tiles tall, and 6 tiles wide. Map blocks and palettes are how the game sets boundaries, and what is visible to the player. All tiles in a block must use the same palette, but are free to use different subpalettes. Two tile blocks that are ajacent to one another and have the same palette will both be visible to the player in-game, thus many tile blocks using the same palette are how the large map areas are created. The map is large, and stored as one large map, which makes map editing a memory intensive operation. Your average PC shouldn’t have to many problems, but older PC’s may struggle, or crash due to out of memory errors. The map itself is 32 tile blocks wide, and 80 tile blocks tall, making the map 2,560 tile blocks large. Most of these blocks are in use already, but there are a number that were not used by the game, and can be safely edited without changing or deleting what’s already in the game.

There are free tile blocks in many places around the map. Some are just a single block, others are a few adjacent tile blocks. There are two tile blocks directly to the right of Onett, six tile blocks stacked vertically just to the right of Peaceful Rest Valley, six tile blocks 2×3 to the southeast of Peaceful Rest Valley, one block in the middle of Winters, one block south of Fourside, two blocks on the northeast side of Twoson, seven blocks around Saturn Valley/Cave of the Past, one block in the middle of Twoson, three blocks between Twoson and the Dusty Dunes Desert, one block on the northeast of the Dusty Dunes Desert, one block between the tunnels south of Threed, and one block in the far southeast corner, near the circus tent from Threed. That makes for 32 unused tile blocks that can be used to add on to the existing game, if you want to add areas without removing anything already in the game.

Of course, you can get rid of sections of the map, or use (1.1.7) the ROM clearing tool to start with an empty map. If you are planning on making small changes, feel free to edit away. If you want to make a completely new experience, use the tool so you have a blank slate to work with. This will remove the hotspots as well, preventing old remnants of the original game from seeping into your hack. Decide before you edit the map if you will use the tool or not, and then do so.


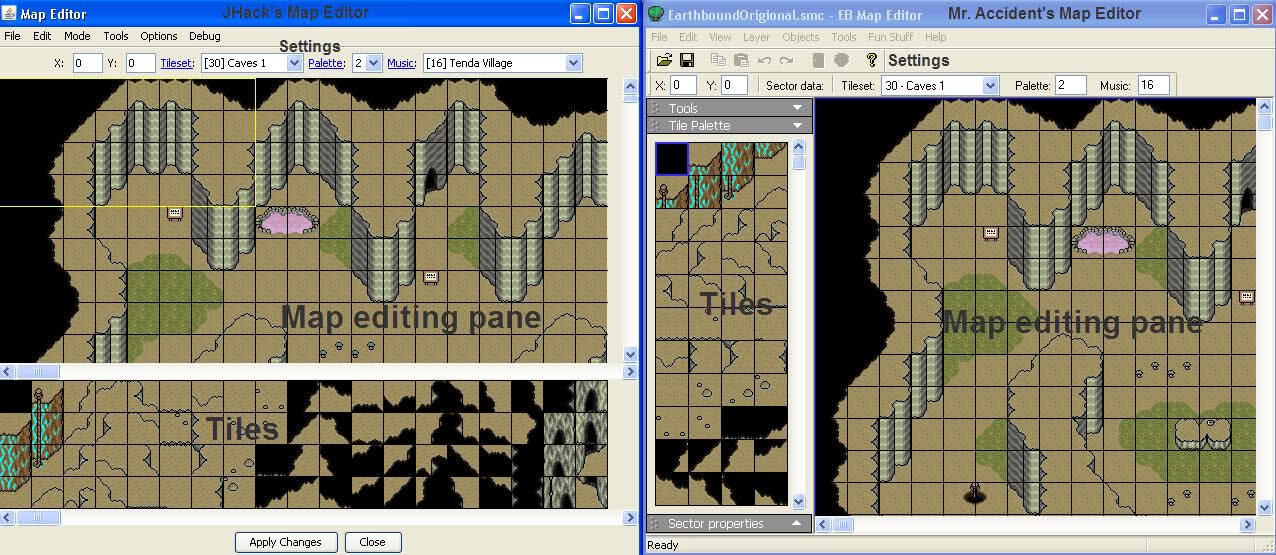
There are two tools for editing the map, provided you follow the order listed above. The JHack editor, and Mr. Accident’s 4.6.1(current stable release?). You will be using Mr. A’s first, then JHack’s editor after you finish doing the doors. This is because as Messianic listed, Mr. A’s is best for making the map, and doors, and JHack’s is best for about everything else.

As you can see, both editors have a Map editing pane, a tiles selector, and a number of options for editing the other parts of the map. Just remember to follow the editing order to avoid problems. Others have done map editing with different orders and had the maps work, but the order allows for the smallest chance of problems.


2. Editing Tile Blocks:

First select which tile block you will be editing, then pick out what tileset you will be using. After that, start placing tiles in that block to make your map. Remember which tiles you set as walkable, and which ones are not. You don’t want to box the player in, or create obstacles where there shouldn’t be. Remember, tile blocks directly above, below, and to each side of the tile block you are editing will be visible in-game to the player if they use the same tileset. This is why the game has a couple of Indoors tilesets, so they can make rooms next to each other without visibility problems.

Go ahead and set the Palette info and music track for the tile block before you save. This right here is your main map editing period. Everything else is just linking the map areas to all the other parts of the game. All actual map making takes place right now. You can reuse tiles as much as you want, but using the same tile over and over looks bland. You will notice most maps in the game have varied edges, with cliffs and treelines shifting around. This is done using many tiles to prevent the edges from being straight lines that look boring. Recreating the cliffs and treelines with the tiles already in the game is very difficult because of this, since you have to pick out tiles that would match up from the large selection of related tiles. Again, it helps to look at how things were done in the game to see what looks good, and which tiles match up with which.

Every time you make a tile block or a few tile blocks, it is recommended that you save your ROM, then make a backup. If your ROM is likely to break, it will happen while you are editing the map. Don’t put the effort of making a town that’s 52 tile blocks large only to have the program crash on you, or your ROM become broken beyond repair. Save often and make backups, more-so now that at any other time when hacking.

When editing the lower left hand corner of the map, it’s possible to overwrite some tiles that are not actually part of the map. When you do, you are overwriting the tileset data for the NW corner’s tile blocks. This is easily fixed by going back to the NW corner and changing the tileset back to what you want it to be. Just something to keep in mind when editing the map.

Again, try to keep the relative sizes of things in mind when making a map. A small building that’s eight stories tall looks strange in a small town, and most homes don’t have doors the size of buses. You should have already planned what the inside of the building should look like, you should make the outside reflect how large it was. If you have an upper floor to the house, it will be jarring to see it only be a single story house outside.

DO NOT FORGET YOUR COLLISION PROPERTIES! Don’t make the mistake of using a tile that looks similar to the one you really wanted, that has a different collision property setting. You could make a map that looks great in the editor, and then later in the testing phase find out you can’t finish the game because a part of the map is impassible. As such, I HIGHLY recommend you create a copy of your ROM once you have your map built, and then setup basic access to your map in-game by disabling all creatures, and opening all doors. This way you can explore every inch of your map and look for mistakes, things that look worse in-game than they did in the editor, things you didn’t think the player could see, bad collision data, and any other problem that needs to be fixed before you continue on.


3. Editing Doors:

Doors require multiple parts of the ROM to match up properly, and so this is easy to screw up. You will be putting the door data on top of the tile collision properties data that specifies a door. If you don’t, your door won’t be usable. This is why it’s important to plan your map, since if you don’t put in the door tile collision data properly, you can’t make the door functional. If you’ve gotten to this point and have realized you haven’t done that, don’t panic. You can still go back and fix things in the tile editor, and on the map itself if need be. You might as well consider this the point of no return. You can still edit your map after this, but the chances of causing some godawful overwrite or corruption greatly increases. Finalize your map and collision data NOW. You do not want to have to take the risk later if you end up needing to change something because you didn’t plan it out. Also, you need to do your expansion of your ROM to 4MB with Mr. Accident’s Map Editor in order to have the Door editing work properly, but you should have already known and done this from earlier in the tutorial.

In Mr. Accident’s Map Editor, select the Layer setting, and choose Doors. You should now see little clear boxes with a border that changes between red and blue all over the map. Each one of these is a door type object. Double clicking on a box brings up the Door Data Editor. Given the size of the map, it may confuse you as to why the co-ordnates given are always less than 32. This is because the door’s location is given for a 32×32 minitile area of the map. The location is given as anywhere from 0-31 to 0-31. It’s not important that you know this, since the editor will handle the location data for you.

There are 977 doors in use in the game, and adding more can possibly cause a broken ROM. I have not played around with this too much, and I do not know the limit of doors you can have. The Door Data Editor will tell you what type of door this entry is, and the destination designation. The door types were explained in 1.5.9, if you missed the list. If you get confused, just check out the doors in the game. Remember, unless you set the door collision property your doors will not function, and that includes ladders, escalators, and signs built into the map itself.

If you really want to add new areas to the game, but want to keep EVERY room/area that’s already there, your best bet is to take the excess doors off of the ladders and ropes in-game. There will be a line of door objects from the top to the bottom of all the ladders and ropes the programmers made. Just take as many as you need. As long as you leave two, one at the very top, and one at the very bottom, the ropes and ladders will still function just fine. This is much safer than trying to make new doors. I’m not 100% sure, but it is believed that adding new doors can cause overwrites or other instability. Unless you are creating some sort of maze with a million doors, odds are the excess doors in the ladders and ropes should be more than enough.

Thanks to Mr. Accident for the following info. For the Ropes/Ladders type of doors, you don’t need a line of them from one side to the other, just one on each side. It’s like that in the ROM just because the people who made it decided to waste space for some odd reason. According to Tomato, you can “jump” through doors in Mr. A’s map editor by holding down CTRL and clicking on a door. This is useful for figuring out where doors go, and is much faster than opening up the door editor and finding the right door.


4. Editing SPT and TPT Entries:

This is where your planning really comes into play. You need to assign SPT and TPT entries, and it really helps if you already know how many you need. This way you can finish up your map before you even create the sprites and text blocks that you will be using. Doing this will save you a great deal of time later, and help decrease chances of destroying your ROM. The Sprite Pointer Table(SPT) is all the NPC’s and enemies in the game. The Text Pointer Table is most of the text in the game, except special bits, and text linked from other text blocks. Before I tell you about editing, I need to explain a little about the SPT and TPT.

First things first, the Text Pointer Table. This is one of those many pointer tables I was talking about earlier. The point of this table is when you talk to a person, item, or object, a window will open and display some text, or run some control codes. Every person you talk to on the map has a TPT entry, every sign, phone, gift box, ect. Most have one pointer listed on the TPT, but it does support a secondary pointer. For example, entry 62 is the Librarian. The first pointer runs three checks against event flags, and will either use different text if the flags come back true, or give the map dialogue if they come back false. The secondary pointer is dialogue for when you use an item(IE Shyness Book).

Every TPT entry has a type, which as previously mentioned can be a Person, Item, or Object. All people, or in some cases enemies you can talk to have a TPT entry, and their type is Person(Phones count for some reason). All gift boxes are Items, and you specify which item is in the box, or money amount if the box contains cash.Everything else from Blinds to Signs are Objects. There are rules about types. A Person type will demand a pointer to some text, since they can be talked to by the player(unless you put them out of reach). You can use a Secondary Pointer if you wish. An Item type only supports a single pointer, but you need to have it. An Object type can have two pointers, but it doesn’t require any pointer at all. You could specify an Object type TPT entry on the map that can’t be talked to, but could have an item used on it. For convienence, think of the first pointer in a TPT entry as the Talking Pointer, and the second pointer as the Use Pointer.

TPT entries also have a Movement Code, Direction, Event Flag, and Visiblity Toggle. Movement Code controls how the NPC moves, if it moves at all. (Need to find movement code list again and put here) Direction is the starting facing when the sprite first appears on the screen. Event Flag is where you can specify if the sprite’s visiblity should be linked to a specific flag. This is useful for switching up NPC’s to reflect changes in the game world. Visiblity Toggle has three settings. True, False, Always On(gift boxes). You can have some NPC’s visible if a flag is on, and a different set if that same flag is off. Combined with the Event Based Map Changes, one single changed flag can completely rewrite an entire area.

You may have noticed the TPT asks for a sprite. What it’s really asking is for a Sprite Pointer Table entry. The SPT is how the game keeps track of what the different NPCs and whatnot look like from different directions, and assigns a ID to a set of sprites that make up one sprite from all directions. A SPT entry can have 16 sprites(walking and idle frames for 8 directions), 9 sprites(4 directional walking and idle, plus idle animation frame, like the mushrooms), or 8 sprites(4 direction walking and idle frames). You don’t need your finished sprites, placeholders will work just fine.

Though you can edit the size of sprites, it is believed that making them larger than the sprite that was there can cause overwrites and instablity, so keep that in mind if you are thinking about making changes to the sizes. Also, there are five unknown variables, leave them alone unless you know what you are doing. By going ahead and setting up your TPT entries and related SPT entries now, you can get a decent idea of how things will look in-game, and prevent the need to come back to map editing later when you make your sprites and text. Once you are done map editing, you will probably not want to do more again for quite some time.

To add a NPC or box or whatever to the map, select the Sprite Edit mode, and then right click where you want to add. Ness will appear, since it is entry 0000 by default. Right click, and choose edit. Pick the TPT entry you wish to edit, and make your changes. Then apply and close the editor, and right click on the Ness again. This time choose Switch TPT, and put in the TPT entry number you just edited. Easy and simple.

Editing SPT entries is not as simple. If you really want larger sprites, there is a button called Reallocate Addresses. Clicking on it will let you move the pointers to the sprites into the expanded area, allowing you to create larger sprites with minimal chances of things blowing up. Width and Height are X times 8. So 2 Width by 3 Height will give you 16 pixels width and 24 pixels height, which is the size of most NPCs. Clicking on a frame will bring you to that sprite, but to change the sprites used or add new sprites, you need to specify the address of the sprite. Once you have the sprite you wish to add to the game, look at the SNES address in the Sprite Editor. The last 4 digits are the address you need, and the first two are the sprite bank number. For example, in SPT entry 01, Ness, Sprite 0 is at D1CF00, thus the address in the SPT is CF 00, and the bank is D1.

Keep in mind, unless you have unchecked “Show Repeat Sprites” in the sprite editor, you are seeing many duplicates. Any edit you make to the BASE sprite will effect all dupes. Another way to tell the difference is to look at the address in the SPT. If it ends in a zero, it’s a unique sprite. If it ends in a one, it’s a flipped/mirrored sprite.

Proper use of the TPT and SPT will allow you to add situational decorations to your maps, completely change the appearance of an area, and is part of the backbone of a good hack. It may seem complicated, but it’s worth the time to learn.


5. Editing Enemy Groups:

As I’ve stated before, I have no experience messing around with this thing. If ANYONE knows what the deal is and don’t mind writing up an explaination, or at least explaining it to me so I can write an explaination, let me know with a PM or something.


6. Editing Hotspots:

I could write up a tutorial about how to edit hotspots, but GuyInSummers already did that ages ago, and it still works today. His tutorial is here. It includes all relevent info about hotspots, including which hotspots are “safe” to edit, and everything you need to know to successfully make your own hotspots (safe meaning they don’t trigger any weird additional stuff we haven’t figured out yet).


7. Editing Map Sector Properties:

You are in the home stretch now! Time for the final detail on your map, the sector properties. This is rather easy compared to the stuff you’ve been doing. All you need to do is go around your map and specify some details. You need to specify the following things, if the player can use PSI Teleport in that location, if using the town map will display a map and which map if so, if the exit mouse should work, if the area should be considered “indoors”, if there should be magic butterflies spawning regularly, or if your characters should be using one of the alternate sprite sets(IE magicant, robots, or miniature). Be sure to check every tile block on your map, and make sure the Sector Properties are correct.

Once you’ve finished, I highly recommend setting up your hack to let you walk around the map without enemies or barriers, so you can test all your collision properties and other odds and ends on the map before you continue hacking.


8. Hyperbound's Map Editing Tutorial:

HyperBound makes maps without the Tileset Editor, and has documented his method for map creation. You can find it here. Feel free to use this method if the Tileset Editor keeps breaking your ROM or whatever.


← 2.1 Tilesets | 2.2 Map Editing | 3.0 Sprite and Other Graphical Editing →

Junk:

Activities:

EarthBound Fanfest 2010
MOTHER 2 Novel Translation Project!
EarthBound Central -- Good News for the Modern Fan
Fangamer Banner
MOTHER 3 Fan Translation
Starmen.Net EarthBound Walkthrough
Starmen.Net Mother 3 Walkthrough
Donate to Starmen.Net!

Site Info:

Wanna know more about the staffers? The Site History? The Forum Badge Guide? All the info is here!

Polls:

How do you use Starmen.net?
Last Week's Poll
Which of the Super Smash Bros. Newcomers is your favourite?
Image of Last Week's Poll

Radio PSI:

Bringing the EarthBound community together through the magic of music.
Privacy Policy